The guts of the Rascal software
This page describes how the software in the Rascal fits together. If you just want to use the Rascal, you don't need to understand any of this; it's just here for the benefit of the hardcore Rascal zealots.
The Rascal starts with 4 pieces of code in its stock configuration. The first three are contained in the 4 MB serial flash; the fourth is on a removable microSD card. The picture below shows a beta unit with the serial flash and microSD card called out.
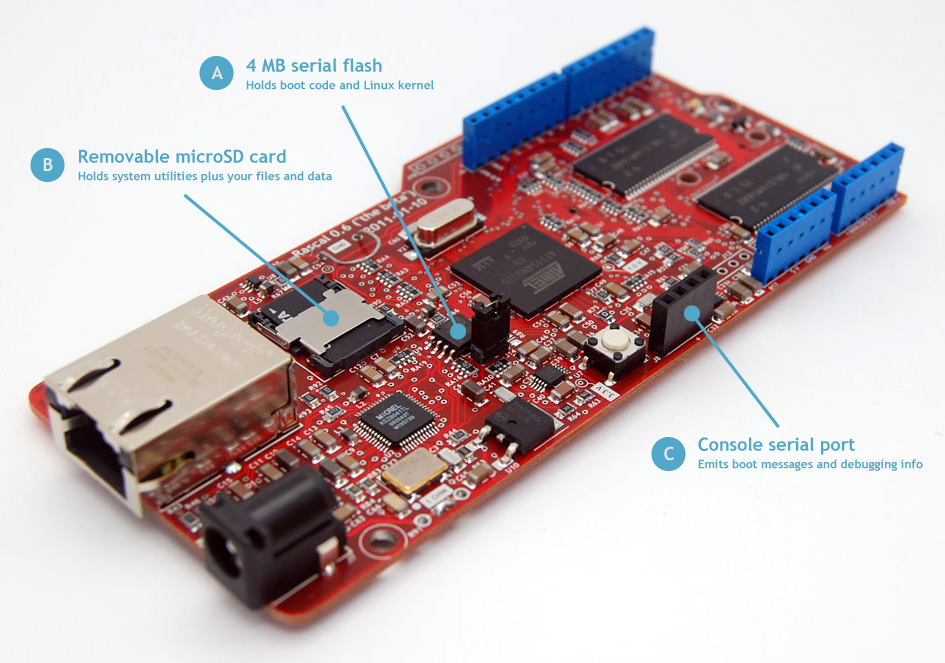
Serial flash
The serial flash holds 4 MB of memory. As long as you're using the Rascal as intended, this memory is read-only. Production versions of the Rascal will probably ship with the serial flash write protected, so that regardless of the horrible contortions you may put the CPU through, you can't corrupt the bootloaders or the Linux kernel.
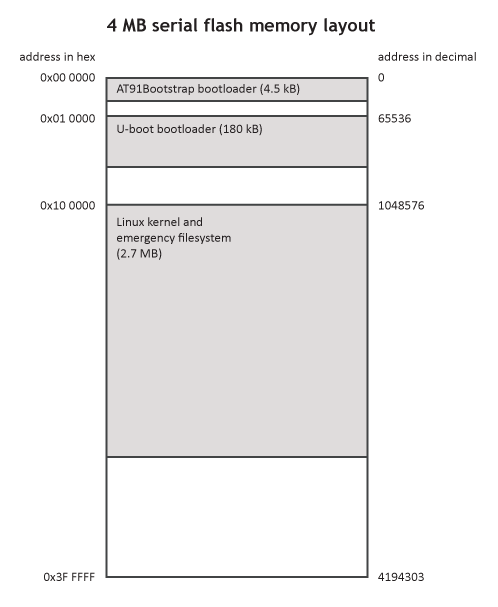
The addresses of the bootloaders in the diagram above are correct but the proportions are wrong so that the labels will fit. In reality, U-boot is around 100x smaller than the Linux kernel, and AT91Bootstrap is another 40x smaller.
MicroSD card
The microSD card is a removable memory card identical to those found in cellphones, but formatted with an EXT3 filesystem rather than the usual FAT32 filesystem. In its stock configuration, the 4 GB card is more than 99% empty; it contains around 30 MB of configuration files and system tools that Linux uses. It also contains the webserver that the Rascal runs. The filesystem on the microSD card is generated by a collection of scripts called OpenEmbedded.
Boot procedure
When the Rascal's AT91SAM9G20 processor boots, it looks for a serial flash. When it finds one, it checks that the first 8 instructions are valid ARM interrupt vectors. If they do, it looks at the value in the sixth vector, and copies that many bytes from the start of the serial flash to its small chunk of internal RAM. On the Rascal, the start of the serial flash is AT91Bootstrap, which contains a sixth vector which is sized so that the rest of AT91Bootstrap is copied.
The CPU then executes AT91Bootstrap, which, among other low-level initialization tasks, prepares the external RAM. AT91Bootstrap's last action is to load the 0x30000 bytes it finds starting at 0x0001 0000 in the serial flash to memory location 0x23F0 0000 in RAM, and then jump to execute that code. 0x0001 0000 is where U-boot is stored, so U-boot starts executing.
In the same pattern that we saw with AT91Bootstrap, U-boot reads 0x2F FFFF bytes from the serial flash starting at 0x10 0000, which is where the Linux kernel starts. Whatever code U-boot reads is copied to 0x2200 0000 and executed.
The total boot process takes around 30 seconds. Most of that time is spent booting the Linux kernel and starting system services; the bootloaders are done in the first couple of seconds.
If this all sounds exciting and you want to try your hand at building some of the code, take a look at the build guide.